


 Sept 28, 2019 2:32:20 GMT -5
 User Offline
Adding Images To Posts
Oct 23, 2019 23:00:18 GMT -5
Post by BJ McConnell on Oct 23, 2019 23:00:18 GMT -5
Everyone likes to add images to their posts. Our forum has three methods to choose from when posting images here, so I've put together a tutorial that should help you to successfully add images to your posts. If you have questions on any of these methods feel free to PM me for help
Method 1 - Adding images to posts using an image hosting service
Proboards, our forum host, does not support local image hosting for embedding into your posts. You can upload images as attachments (more on that later). So, this first method will require you to have an image hosting service where you can upload your images somewhere on the web. Once your images are hosted on the web, then you can embed URL's (a process known as direct linking) in your post that will pull the image in when the post is viewed. There are numerous options for image hosting services - some are free, but the better services with unlimited bandwidth and storage will cost you a small monthly fee. For help in choosing an image hosting service, see this article. Okay, let's get started...
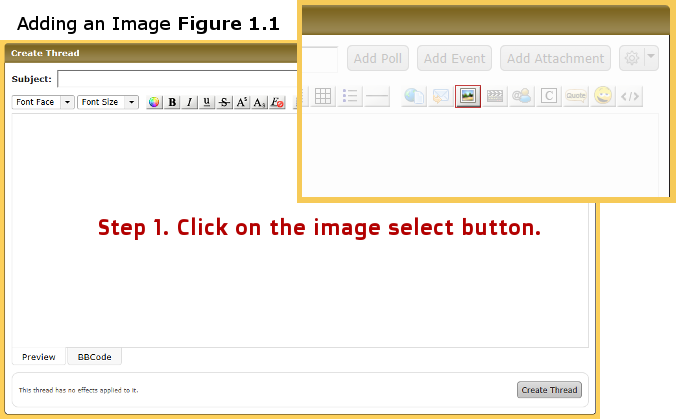
Step 1. Once you have your direct link URL from your image hosting service and you've reached a point in your post where you are ready to place an image, click on the "insert image" button (see figure 1.1)
Step 2. A pop-up window will come up for you to enter information for your image. Enter the direct link URL provided by your image hosting service in the top field and enter optional text for the image in the bottom field if you wish. If you don't want to add text just leave the bottom field blank (see figure 1.2)

Step 3. Click the "insert image" button at the bottom of the pop-up window and you're done! Please take note it sometimes takes a few seconds for the image to populate into your post so just sit tight until it shows up and then continue editing your post once you can see your image (see figure 1.3)

That's all there is to it when using an image hosting service. The longest part of the process is choosing your hosting service and becoming familiar with uploading and linking to images on the host server. Now let's move on to the attachment method.
Adding Images As Attachments
Adding images using attachments is a little more involved than the method previously discussed, but it does have the benefit of being performed locally within the forum, so there's no need to use an offsite image hosting service. The biggest downfall is that your images will not look as visually appealing. You will see what I mean as we go through this tutorial.
With attachments, you have two different options on how to insert the image. First, you can insert the attachment anywhere inline with the text of your post. This will insert the attachment wherever your cursor is currently located within the post window. The other option is to insert the attachment to the end of the post. What you are trying to accomplish with your images will help you decide which method you need to use.
No matter which attachment method you choose, the image will be inserted as a thumbnail which can then be clicked on to view the full size image in a blank browser window. I'll show you what this looks like shortly. So let's begin by looking at the second method for inserting images, inline attachments.
Method 2 - Adding images as inline attachments
Step 1. To insert your image inline with your text, first begin writing your post. When you're ready to insert your image, leave your cursor where you want the image to be inserted and click on the "Add Attachment" button (see figure 2.1)

Step 2. Once the attachment window pops up, click on the "Add files..." button (see figure 2.2)
Adding an image Figure 2.2

Step 3. A window will pop up that will allow you to choose your image from your computer. Select your image and then click on the "Open" button and the image will upload (see figure 2.3)
Adding an image Figure 2.3

Step 4. Once the image has uploaded, click the "Insert" button (see figure 2.4) If you want to upload multiple images, just repeat steps 2 and 3 for as many images as you are attaching to the post.
Adding an image Figure 2.4

Step 5. The image thumbnail(s) will populate and you can click "Done" to close the pop-up window (see figure 2.5)
Adding an image Figure 2.5

Figure 2.6 demonstrates what the post will look like once the attachment is inserted at the cursor. It's worth noting that the thumbnail image size is fixed, so you cannot change it's size within the post.
Adding an image Figure 2.6

And that's it for adding an image as an inline attachment. Now let's go over the final method for adding an image to your post.
Method 3 - Adding an image as an attachment at the end of a post
Inserting an image as an attachment at the end of your post is less complicated than the previous attachment method, and it's the easiest of the three methods by far. If you are looking to share images in the forum for viewing only then this final method is a great way to do it.
With this method you have a couple options on how to begin. You can either write out your complete post and then insert the attachment, or you can immediately attach the image and then write your post. Either way, the thumbnail will not appear at the end of the post until you create your thread. For the purposes of this tutorial we will go straight to inserting the attachment, adding our text to the post last.
Step 1. Click on the "Add Attachment" button (see figure 3.1)

Step 2. Once the window pops up, click on the "Add files..." button (see figure 3.2)
Adding an image Figure 3.2
Step 3. Once your file window pops up, select your file and click the "Open" button (see figure 3.3)
Adding an image Figure 3.3
Step 4. When your file is done uploading, click on the "Done" button (see figure 3.4)
Adding and image Figure 3.4
That's it! Now you can write your post and create your thread. The attachment thumbnail will be at the bottom of the post (see figure 3.5)
Adding an image Figure 3.5
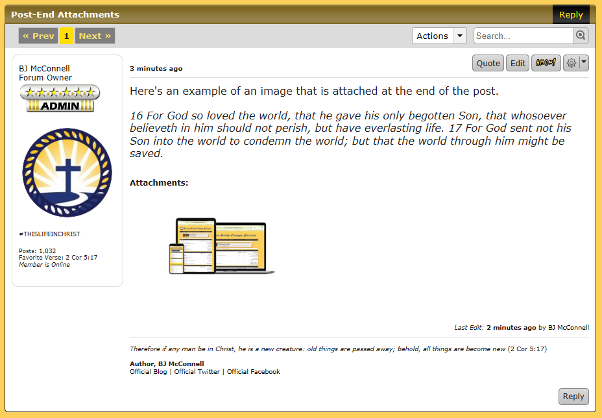
I mentioned earlier that the image thumbnail is inserted as a link that opens in a blank browser window when you click on the thumbnail. Here's what it looks like in your browser when you click on the attached thumbnail...

When you're done viewing the images then you will have to click on the back button of your browser to return to the forums.
That's all three methods for inserting an image to your post!
The Good, the Bad and the Ugly of Each Method
It may seem a little overwhelming when learning all three methods at once, especially compared to other social media sites, but once you get used to each method it's not all that difficult. The main point I want to stress is that each method has its use depending on what you are trying to accomplish with your post.
If you need your images to flow with your text (as I did for this tutorial) then using an image hosting service is by far the superior and more visually attractive method. The main downfall with that method is having to set up an image hosting service.
If you care about having more options from your hosting service, especially if you are a heavy image poster on multiple social media sites, then it may be worth looking into a paid service. As the saying goes, you get what you pay for.
But with that said, a little research will help you find some decent free options as well. So while paying for a premium hosting service can get you some great imaging options, if you don't want to shell out the cash it's not really necessary. Once again, this article gives a good rundown of many of the top hosting options on the web today.
Of the three, inline attachments are the least appealing in my opinion. But if you need your images to be located within your post text and using an image hosting service is too intimidating, then inline attachments will probably work for you, assuming it doesn't bother you if your readers have to view the image in a separate window and then click back to the forums to continue reading your post.
Finally, attaching images to the end of your post can be a great option in certain circumstances. For instance, if all you want to do is share your images so readers can view them similarly to an image gallery and your post text can stand on its own, then attaching images to the end of a post is easy, and visually it works well in an image-on-display situation. It's also a great option for really large images that would be downsized to fit into a post window. But the trade-off is that it is negatively impacted in the same way as inline attachments because it does not flow with your post text and readers will have to click back and forth between browser windows to read your post and view your images.
Ultimately, the goal of your post will likely dictate which method works best for you. Ideally, you may find yourself using a combination of the three methods as needed. If you have any questions about this tutorial or imaging in general, send me a private message (PM) and I will help you the best I can.
Happy posting!!
Method 1 - Adding images to posts using an image hosting service
Proboards, our forum host, does not support local image hosting for embedding into your posts. You can upload images as attachments (more on that later). So, this first method will require you to have an image hosting service where you can upload your images somewhere on the web. Once your images are hosted on the web, then you can embed URL's (a process known as direct linking) in your post that will pull the image in when the post is viewed. There are numerous options for image hosting services - some are free, but the better services with unlimited bandwidth and storage will cost you a small monthly fee. For help in choosing an image hosting service, see this article. Okay, let's get started...
Step 1. Once you have your direct link URL from your image hosting service and you've reached a point in your post where you are ready to place an image, click on the "insert image" button (see figure 1.1)
Step 2. A pop-up window will come up for you to enter information for your image. Enter the direct link URL provided by your image hosting service in the top field and enter optional text for the image in the bottom field if you wish. If you don't want to add text just leave the bottom field blank (see figure 1.2)
Step 3. Click the "insert image" button at the bottom of the pop-up window and you're done! Please take note it sometimes takes a few seconds for the image to populate into your post so just sit tight until it shows up and then continue editing your post once you can see your image (see figure 1.3)
That's all there is to it when using an image hosting service. The longest part of the process is choosing your hosting service and becoming familiar with uploading and linking to images on the host server. Now let's move on to the attachment method.
Adding Images As Attachments
Adding images using attachments is a little more involved than the method previously discussed, but it does have the benefit of being performed locally within the forum, so there's no need to use an offsite image hosting service. The biggest downfall is that your images will not look as visually appealing. You will see what I mean as we go through this tutorial.
With attachments, you have two different options on how to insert the image. First, you can insert the attachment anywhere inline with the text of your post. This will insert the attachment wherever your cursor is currently located within the post window. The other option is to insert the attachment to the end of the post. What you are trying to accomplish with your images will help you decide which method you need to use.
No matter which attachment method you choose, the image will be inserted as a thumbnail which can then be clicked on to view the full size image in a blank browser window. I'll show you what this looks like shortly. So let's begin by looking at the second method for inserting images, inline attachments.
Method 2 - Adding images as inline attachments
Step 1. To insert your image inline with your text, first begin writing your post. When you're ready to insert your image, leave your cursor where you want the image to be inserted and click on the "Add Attachment" button (see figure 2.1)
Step 2. Once the attachment window pops up, click on the "Add files..." button (see figure 2.2)
Adding an image Figure 2.2
Step 3. A window will pop up that will allow you to choose your image from your computer. Select your image and then click on the "Open" button and the image will upload (see figure 2.3)
Adding an image Figure 2.3
Step 4. Once the image has uploaded, click the "Insert" button (see figure 2.4) If you want to upload multiple images, just repeat steps 2 and 3 for as many images as you are attaching to the post.
Adding an image Figure 2.4
Step 5. The image thumbnail(s) will populate and you can click "Done" to close the pop-up window (see figure 2.5)
Adding an image Figure 2.5
Figure 2.6 demonstrates what the post will look like once the attachment is inserted at the cursor. It's worth noting that the thumbnail image size is fixed, so you cannot change it's size within the post.
Adding an image Figure 2.6
And that's it for adding an image as an inline attachment. Now let's go over the final method for adding an image to your post.
Method 3 - Adding an image as an attachment at the end of a post
Inserting an image as an attachment at the end of your post is less complicated than the previous attachment method, and it's the easiest of the three methods by far. If you are looking to share images in the forum for viewing only then this final method is a great way to do it.
With this method you have a couple options on how to begin. You can either write out your complete post and then insert the attachment, or you can immediately attach the image and then write your post. Either way, the thumbnail will not appear at the end of the post until you create your thread. For the purposes of this tutorial we will go straight to inserting the attachment, adding our text to the post last.
Step 1. Click on the "Add Attachment" button (see figure 3.1)
Step 2. Once the window pops up, click on the "Add files..." button (see figure 3.2)
Adding an image Figure 3.2
Step 3. Once your file window pops up, select your file and click the "Open" button (see figure 3.3)
Adding an image Figure 3.3
Step 4. When your file is done uploading, click on the "Done" button (see figure 3.4)
Adding and image Figure 3.4
That's it! Now you can write your post and create your thread. The attachment thumbnail will be at the bottom of the post (see figure 3.5)
Adding an image Figure 3.5
I mentioned earlier that the image thumbnail is inserted as a link that opens in a blank browser window when you click on the thumbnail. Here's what it looks like in your browser when you click on the attached thumbnail...
When you're done viewing the images then you will have to click on the back button of your browser to return to the forums.
That's all three methods for inserting an image to your post!
The Good, the Bad and the Ugly of Each Method
It may seem a little overwhelming when learning all three methods at once, especially compared to other social media sites, but once you get used to each method it's not all that difficult. The main point I want to stress is that each method has its use depending on what you are trying to accomplish with your post.
If you need your images to flow with your text (as I did for this tutorial) then using an image hosting service is by far the superior and more visually attractive method. The main downfall with that method is having to set up an image hosting service.
If you care about having more options from your hosting service, especially if you are a heavy image poster on multiple social media sites, then it may be worth looking into a paid service. As the saying goes, you get what you pay for.
But with that said, a little research will help you find some decent free options as well. So while paying for a premium hosting service can get you some great imaging options, if you don't want to shell out the cash it's not really necessary. Once again, this article gives a good rundown of many of the top hosting options on the web today.
Of the three, inline attachments are the least appealing in my opinion. But if you need your images to be located within your post text and using an image hosting service is too intimidating, then inline attachments will probably work for you, assuming it doesn't bother you if your readers have to view the image in a separate window and then click back to the forums to continue reading your post.
Finally, attaching images to the end of your post can be a great option in certain circumstances. For instance, if all you want to do is share your images so readers can view them similarly to an image gallery and your post text can stand on its own, then attaching images to the end of a post is easy, and visually it works well in an image-on-display situation. It's also a great option for really large images that would be downsized to fit into a post window. But the trade-off is that it is negatively impacted in the same way as inline attachments because it does not flow with your post text and readers will have to click back and forth between browser windows to read your post and view your images.
Ultimately, the goal of your post will likely dictate which method works best for you. Ideally, you may find yourself using a combination of the three methods as needed. If you have any questions about this tutorial or imaging in general, send me a private message (PM) and I will help you the best I can.
Happy posting!!